2024/6/24...大约 4 分钟
学校 SCM 超算平台使用
一、参考文档
使用文档见:SCM 超算平台使用(踩坑指南) - 飞书云文档 (feishu.cn)
二、一个实例
1. 更换系统镜像源
ubuntu | 镜像站使用帮助 | 清华大学开源软件镜像站 | Tsinghua Open Source Mirror
mv /etc/apt/sources.list /etc/apt/sources.list.backup
touch /etc/apt/sources.list
vim /etc/apt/sources.list  # 下方内容
# 默认注释了源码镜像以提高 apt update 速度,如有需要可自行取消注释
deb https://mirrors.tuna.tsinghua.edu.cn/ubuntu/ jammy main restricted universe multiverse
# deb-src https://mirrors.tuna.tsinghua.edu.cn/ubuntu/ jammy main restricted universe multiverse
deb https://mirrors.tuna.tsinghua.edu.cn/ubuntu/ jammy-updates main restricted universe multiverse
# deb-src https://mirrors.tuna.tsinghua.edu.cn/ubuntu/ jammy-updates main restricted universe multiverse
deb https://mirrors.tuna.tsinghua.edu.cn/ubuntu/ jammy-backports main restricted universe multiverse
# deb-src https://mirrors.tuna.tsinghua.edu.cn/ubuntu/ jammy-backports main restricted universe multiverse
# 以下安全更新软件源包含了官方源与镜像站配置,如有需要可自行修改注释切换
deb http://security.ubuntu.com/ubuntu/ jammy-security main restricted universe multiverse
# deb-src http://security.ubuntu.com/ubuntu/ jammy-security main restricted universe multiverse注:一般只要前 3 条即可
2. 本地设置好代理
设置为 http://10.12.42.14:10999,及本地的内网 ip 地址和设置的代理端口,详见该篇。
3. 开启远程 ssh 服务
3.1 安装 openssh-server
apt update -o Acquire::http::Proxy="http://10.12.42.14:10999"
apt install openssh-server -o Acquire::http::Proxy="http://10.12.42.14:10999"
[!CAUTION]
当在无网/未配置代理的 ubuntu 容器中直接执行
apt update时,可能会出现奇奇怪怪的报错,不要心急,记得尝试添加-o Acquire::http::Proxy="http://10.12.42.14:10999"或直接使用下面的方法代理试试,说不定就解决了。# ehco "<下列内容>" >> ~/.bashrc remote_ip="10.12.42.14" remote_port="10999" alias start-proxy="export http_proxy=http://${remote_ip}:${remote_port} https_proxy=http://${remote_ip}:${remote_port}" alias stop-proxy="unset http_proxy https_proxy"
3.2 配置 ssh_config
vim /etc/ssh/ssh_config # 更改 PasswordAuthentication yes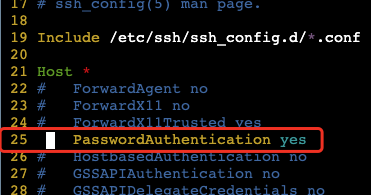
3.3 配置 sshd_config
需要安装 openssh-server
vim /etc/ssh/sshd_config # 更改 PermitRootLogin yes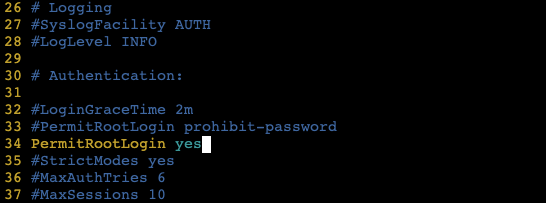
3.4 配置用户密码
passwd3.5 重启 ssh 服务
/etc/init.d/ssh restart4. .bashrc 配置别名
vim ~/.bashrc  # 添加如下内容
source ~/.bashrc
start-proxy
# 设置代理
remote_ip="10.12.42.14"
remote_port="10999"
# https 也要用 http://xxxx 代理才行,不知道为啥子,可能 squidman 设置的 http
alias start-local-proxy="export http_proxy=http://${remote_ip}:${remote_port} https_proxy=http://${remote_ip}:${remote_port}"
alias start-git-proxy="git config --global http.proxy http://${remote_ip}:${remote_port};git config --global https.proxy http://${remote_ip}:${remote_port}"
alias start-pip-proxy="pip config set global.proxy http://${remote_ip}:${remote_port}"
alias start-conda-proxy="conda config --set proxy_servers.http http://${remote_ip}:${remote_port};conda config --set proxy_servers.https http://${remote_ip}:${remote_port}"
alias stop-local-proxy="unset http_proxy https_proxy"
alias stop-git-proxy="git config --global --unset http.proxy;git config --global --unset https.proxy"
alias stop-pip-proxy="pip config unset global.proxy"
alias stop-conda-proxy="conda config --remove-key proxy_servers.http" # ;conda config --remove-key proxy_servers.https" # 这里设置一次即可删除 http & https,不知道为啥
alias start-proxy="start-local-proxy;start-pip-proxy;start-git-proxy;start-conda-proxy"
alias stop-proxy="stop-local-proxy;stop-pip-proxy;stop-git-proxy;stop-conda-proxy"
# 快捷跳转
base_dir="/home" # 挂载点
alias cdp="cd ${base_dir}/data/zkye/project"
alias cdm="cd ${base_dir}/data/zkye/models"
alias activatelf="conda activate llamafactory"
alias nvi="nvitop --colorful"5. 配置 zsh
5.1 安装 zsh
apt update
apt install zsh
5.2 安装 omz
cd ${path_to_dir}
# 使用清华镜像仓库
git clone https://mirrors.tuna.tsinghua.edu.cn/git/ohmyzsh.git
cd ohmyzsh/tools
REMOTE=https://mirrors.tuna.tsinghua.edu.cn/git/ohmyzsh.git sh install.sh
5.3 安装常用插件
# 安装常用插件
git clone https://github.com/zsh-users/zsh-autosuggestions $ZSH_CUSTOM/plugins/zsh-autosuggestions
git clone https://github.com/zsh-users/zsh-syntax-highlighting.git $ZSH_CUSTOM/plugins/zsh-syntax-highlighting
 git clone https://github.com/zsh-users/zsh-history-substring-search ${ZSH_CUSTOM:-~/.oh-my-zsh/custom}/plugins/zsh-history-substring-search
5.4 修改配置文件
vim ~/.zshrc  # 编辑配置文件如下
source ~/.zshrcplugins=(
git
zsh-autosuggestions
)
# alias 同上面 .bashrc 配置6. 配置 conda
6.1 安装 miniconda
anaconda | 镜像站使用帮助 | 清华大学开源软件镜像站 | Tsinghua Open Source Mirror
sh /home/envs/packages/Miniconda3-py39_24.4.0-0-Linux-x86_64.sh
# yes
# 回车
# yes
source ~/.zshrc
start-proxy
6.2 更换镜像源
channels:
  - defaults
show_channel_urls: true
default_channels:
  - https://mirrors.tuna.tsinghua.edu.cn/anaconda/pkgs/main
  - https://mirrors.tuna.tsinghua.edu.cn/anaconda/pkgs/r
  - https://mirrors.tuna.tsinghua.edu.cn/anaconda/pkgs/msys2
custom_channels:
  conda-forge: https://mirrors.tuna.tsinghua.edu.cn/anaconda/cloud
  msys2: https://mirrors.tuna.tsinghua.edu.cn/anaconda/cloud
  bioconda: https://mirrors.tuna.tsinghua.edu.cn/anaconda/cloud
  menpo: https://mirrors.tuna.tsinghua.edu.cn/anaconda/cloud
  pytorch: https://mirrors.tuna.tsinghua.edu.cn/anaconda/cloud
  pytorch-lts: https://mirrors.tuna.tsinghua.edu.cn/anaconda/cloud
  simpleitk: https://mirrors.tuna.tsinghua.edu.cn/anaconda/cloud
  deepmodeling: https://mirrors.tuna.tsinghua.edu.cn/anaconda/cloud/
6.3 创建 python 环境:
conda create -n env_name python=3.x7. 安装 git-lfs:
apt install git-lfs
git lfs install  # 在目标目录执行
8. 安装 htop:
apt install htop9. 安装 nvitop:
pip install --upgrade pipx
pipx install nvitop
# 记得按照提示配置环境
pipx ensurepath
nvitop --colorful
10. 安装 screen:
apt install screen
screen -S _name # 创建会话
screen -ls # 查看创建的会话及id
# ctrl + a, d # 将当前会话切到后台
screen -r _id # 切回会话id
11. 使用 tar解压缩
# 压缩
tar -cvf 压缩文件名.tar 目录
tar -czvf 压缩文件名.tar.gz 目录

# 解压
tar -xvf 压缩文件名.tar
tar -xzvf 压缩文件名.tar.gz

# 查看
tar -tvf 压缩文件| 参数 | 含义 |
|---|---|
| -c | 创建一个新的 tar 文件 |
| -x | 从 tar 文件中提取文件 |
| -v | 显示解压缩详细信息 |
| -f | 指定文件名 |
| -z | 使用 gzip 进行压缩 |
| -t | 列出 tar 文件内容 |